How to Troubleshoot 3-Phase Breaker Install Issues at Home
Want this done properly without the hassle?
Aap DIY try kar sakte hain, lekin agar time nahi ya confidence kam ho, to professional bula lena better hota hai. Galat step se damage ya safety issue ho sakta hai.
Quick answer (read this first)
- Always disconnect the main power supply before beginning any inspection.
- Perform a thorough visual check for physical damage or loose connections.
- Verify the correct wiring sequence and ensure proper breaker rating.
- Use a multimeter to check for balanced voltage across all phases (with extreme caution).
- If unsure or encountering complex issues, immediately call a certified electrician.
Safety first
- Always turn off the main power supply at the meter or main distribution board before starting any electrical work.
- Confirm power is off using a voltage tester or multimeter before touching any components.
- Use only insulated tools rated for electrical work to prevent shocks.
- Never attempt to work on live circuits; even low voltage can be dangerous.
- Wear appropriate personal protective equipment, including safety gloves and eye protection.
- If you encounter any burning smells, sparks, or feel uncomfortable at any point, stop immediately and contact a qualified electrician.
Tools you may need
- Multimeter (with voltage and continuity functions)
- Insulated Screwdrivers (flathead and Phillips)
- Wire Stripper/Cutter (if rewiring is suspected)
- Electrical Tape
- Non-contact Voltage Tester (optional for quick checks)
Step-by-step
Step 1
Securely Turn Off Main Power: Locate your home’s main breaker or power meter and switch off the entire electrical supply. Confirm power is off using a non-contact voltage tester or multimeter.
Step 2
Conduct a Thorough Visual Inspection: Examine the 3-phase breaker and its surrounding wiring within the distribution board for any visible signs of damage, such as burn marks, melted plastic, frayed wires, or discoloration.
Step 3
Check All Wire Connections: With power off, carefully inspect all terminal screws connected to the breaker and within the distribution board. Ensure all wires are firmly seated and screws are tightened; loose connections are a common fault.
Step 4
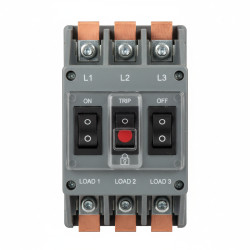
Verify Wiring Sequence and Configuration: Confirm that the phase wires (L1, L2, L3 or R, Y, B, depending on local standards) are connected to their correct terminals on the 3-phase breaker, following standard wiring diagrams.
Step 5
Test Breaker Continuity (Power Off): Use a multimeter in continuity mode. Test the breaker when it’s switched ‘ON’ (it should show continuity) and ‘OFF’ (it should show no continuity) to check its internal switching mechanism.
Step 6
Carefully Test Phase Voltages (Power On Briefly): If you are confident and trained, momentarily restore main power. Using an insulated multimeter, measure voltage between each phase wire and the neutral, and then between phases. Look for balanced readings (e.g., 400V between phases, 230V phase-to-neutral in Pakistan). Immediately cut power after testing.
Step 7
Reset the Breaker: If all previous checks are clear, switch the 3-phase breaker fully to the ‘OFF’ position, wait a few seconds, then firmly switch it back to the ‘ON’ position to reset its internal mechanism.
Common mistakes
- Failing to completely turn off the main power supply before attempting any work.
- Using a breaker with an incorrect current rating or type for the connected electrical load.
- Not adequately tightening terminal screws, which can lead to arcing, overheating, and fire hazards.
- Incorrectly identifying or connecting the phase wires, causing phase imbalance or short circuits.
- Ignoring early warning signs like persistent burning smells, humming noises, or flickering lights.
- Attempting repairs without proper insulated tools or sufficient electrical knowledge.
When to call a professional
- If you are uncomfortable, unsure, or lack the proper tools or expertise for any step of the troubleshooting process.
- If you observe persistent burning smells, visible sparks, smoke, or hear unusual arcing sounds from the breaker or wiring.
- If the 3-phase breaker trips immediately after being reset, indicating a persistent fault.
- If your multimeter readings show zero power, severely unbalanced voltages, or unusual readings after troubleshooting.
- If you suspect the breaker itself is internally faulty, damaged, or beyond simple troubleshooting fixes.
- For any complex wiring modifications, upgrades, or if issues persist after attempting basic troubleshooting steps.
Want this done properly without the hassle?
Aap DIY try kar sakte hain, lekin agar time nahi ya confidence kam ho, to professional bula lena better hota hai. Galat step se damage ya safety issue ho sakta hai.


