How to Safely Replace an AC Capacitor: A DIY Guide
Want this done properly without the hassle?
Aap DIY try kar sakte hain, lekin agar time nahi ya confidence kam ho, to professional bula lena better hota hai. Galat step se damage ya safety issue ho sakta hai.
Quick answer (read this first)
- AC not starting or blowing warm air?
- Hear a loud humming or clicking from the outdoor unit?
- A bulging, leaking, or burnt capacitor often indicates failure.
- Always turn off AC power at the main breaker before any inspection or work.
Safety first
- ALWAYS switch off the AC’s main power at the breaker before any inspection or work.
- Capacitors store lethal electrical charges; discharge them safely using an insulated tool before handling.
- Wear insulated gloves and safety glasses. Use only insulated tools to prevent electric shock.
- Never touch capacitor terminals directly or without confirming it’s fully discharged.
- If you feel uncomfortable or unsure at any point, stop immediately and contact a qualified professional.
Tools you may need
- Screwdriver (Phillips and Flathead)
- Insulated Pliers
- Multimeter (with capacitance testing feature)
- Insulated Work Gloves
- Safety Glasses
- Capacitor discharge tool (or an insulated screwdriver)
Step-by-step
Step 1
Step 1: Disconnect and Verify Power. Locate the AC unit’s main breaker (usually in your home’s electrical panel) and the outdoor disconnect switch. Turn both OFF. Use a voltage tester to confirm no power reaches the outdoor unit.
Step 2
Step 2: Access the Capacitor. Carefully unscrew and remove the service panel cover on your outdoor AC unit. This will expose the electrical components, including the capacitor.
Step 3
Step 3: Perform a Visual Inspection. Look closely at the capacitor for any signs of damage like bulging tops, leaks, discoloration, or burn marks. These are strong indicators that the capacitor has failed.
Step 4
Step 4: SAFELY Discharge the Capacitor. Wearing insulated gloves, use an insulated screwdriver with a metal shaft to bridge the terminals of the capacitor for several seconds to safely discharge any stored electrical charge.
Step 5
Step 5: Test the Capacitor (Optional but Recommended). If you have a multimeter, set it to capacitance mode. Disconnect the wires from the capacitor terminals, then connect the multimeter probes to the terminals. Compare the measured microfarad (uF) reading with the capacitor’s printed rating. A significant deviation indicates failure.
Step 6
Step 6: Label and Disconnect Wires. Take a clear photo of the wiring configuration or label each wire before carefully disconnecting them from the old capacitor’s terminals.
Step 7
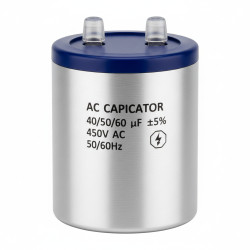
Step 7: Remove the Old Capacitor. Unmount or unclamp the old capacitor from its housing. Note its orientation and ensure the replacement is the same type and rating (MFD and Voltage).
Step 8
Step 8: Install the New Capacitor. Place the new capacitor into the housing, ensuring it’s securely mounted. Reconnect the labeled wires to their corresponding terminals on the new capacitor.
Step 9
Step 9: Reassemble the Unit. Double-check all wire connections for security. Replace the service panel cover, ensuring all screws are tightened.
Step 10
Step 10: Restore Power and Test. Turn the main breaker and outdoor disconnect switch back ON. Turn on your AC unit and observe if it starts and runs correctly.
Common mistakes
- Ignoring the critical step of turning off the main power breaker.
- Failing to safely discharge the capacitor, leading to severe electric shock.
- Touching capacitor terminals directly without insulated tools or protective gloves.
- Installing an incorrect replacement capacitor (wrong MFD or voltage rating).
- Assuming the capacitor is the only issue without proper diagnosis.
- Forgetting to label wires before disconnecting, leading to incorrect reinstallation.
When to call a professional
- If you are not confident working with electricity or lack the necessary tools.
- If you cannot safely access the AC unit or identify the capacitor.
- If wiring appears complex, damaged, or you are unsure about discharge procedures.
- If replacing the capacitor doesn’t fix the AC unit’s problem.
- If you suspect other significant electrical, refrigerant, or mechanical issues.
Want this done properly without the hassle?
Aap DIY try kar sakte hain, lekin agar time nahi ya confidence kam ho, to professional bula lena better hota hai. Galat step se damage ya safety issue ho sakta hai.