How to Troubleshoot AC Capacitor Replacement Issues at Home
Want this done properly without the hassle?
Aap DIY try kar sakte hain, lekin agar time nahi ya confidence kam ho, to professional bula lena better hota hai. Galat step se damage ya safety issue ho sakta hai.
Quick answer (read this first)
- Verify correct wiring connections after replacement.
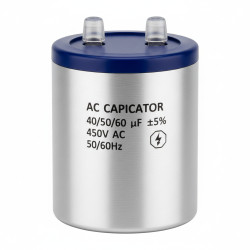
- Ensure the new capacitor matches original specifications.
- Check for loose terminals, blown fuses, or tripped breakers.
- Confirm the AC unit is receiving stable power supply.
- Test the new capacitor for proper function if issues persist.
Safety first
- Always turn off the main power to the AC unit at the circuit breaker before starting.
- Safely discharge the old capacitor using an insulated screwdriver across its terminals.
- Wear insulated gloves and safety glasses when handling electrical components.
- Do not touch electrical terminals with bare hands.
- If you are unsure or uncomfortable, stop immediately and call a qualified electrician.
Tools you may need
- Insulated screwdriver
- Multimeter (with capacitance testing)
- Needle-nose pliers
- Wire strippers/cutters
- Work gloves
- Safety glasses
- Non-contact voltage tester
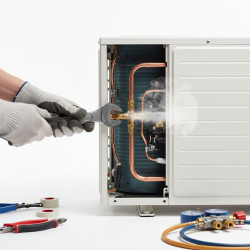
Step-by-step
Step 1
Verify Power Disconnection: Confirm the main power to your AC unit is completely off at the circuit breaker. Use a non-contact voltage tester to ensure no current is present before proceeding.
Step 2
Inspect Wiring Connections: Carefully re-examine all wiring connections made during the replacement. Ensure each wire from the AC unit’s fan motor, compressor, and power input is securely connected to the correct terminals (Herm, Fan, Common) on the new capacitor. Look for any loose or misplaced wires.
Step 3
Confirm Capacitor Specifications: Double-check that the MFD (microfarad) and voltage ratings of the new capacitor precisely match the original unit’s requirements. Incorrect ratings are a very common cause of post-replacement issues.
Step 4
Check for Loose Terminals, Fuses, or Breakers: Look for any loose, corroded, or burnt terminals on the capacitor, contactor, or associated wiring. Inspect the fuse in the outdoor unit’s disconnect box for signs of being blown, and verify the main circuit breaker hasn’t tripped.
Step 5
Test the New Capacitor (If Possible): If your multimeter has a capacitance function, test the newly installed capacitor to ensure it is functioning within its specified range. A brand-new part can occasionally be faulty.
Step 6
Observe AC Unit Start-up: Restore power and carefully observe the AC unit’s behavior for any abnormalities. Listen for unusual noises like a humming without the fan or compressor starting, or signs of the unit struggling to engage.
Step 7
Monitor for Overheating: After the unit runs for a few minutes, cautiously feel the compressor and fan motor housings. Excessive heat indicates a potential problem with the motor itself, an overload, or an incorrectly sized capacitor.
Common mistakes
- Incorrectly wiring the terminals (e.g., Herm to Fan).
- Using a capacitor with mismatched MFD or voltage ratings.
- Not fully discharging the old capacitor before handling.
- Failing to check other components like fuses or breakers.
- Assuming the capacitor is the only issue without further investigation.
When to call a professional
- If the AC unit still fails to operate correctly after comprehensive troubleshooting.
- If you observe burning smells, visible smoke, or hear alarming electrical sounds.
- When dealing with complex electrical circuits beyond basic wiring.
- If you suspect damage to major components like the compressor or fan motor.
- Anytime you feel uncomfortable or unsafe performing the repair.
Want this done properly without the hassle?
Aap DIY try kar sakte hain, lekin agar time nahi ya confidence kam ho, to professional bula lena better hota hai. Galat step se damage ya safety issue ho sakta hai.