How to do a basic Ceiling Clothes Hanger Install safety check and quick fixes
Want this done properly without the hassle?
Aap DIY try kar sakte hain, lekin agar time nahi ya confidence kam ho, to professional bula lena better hota hai. Galat step se damage ya safety issue ho sakta hai.
Quick answer (read this first)
- Tighten all screws and mounting bolts regularly.
- Inspect ropes, chains, and pulleys for wear or damage.
- Ensure hanger stability; avoid overloading.
- Lubricate squeaky pulleys or moving parts.
- Promptly replace any worn ropes or damaged components.
Safety first
- Always use a sturdy, stable ladder; consider having a spotter.
- Never use chairs or unstable objects as a substitute for a ladder.
- Wear safety gloves to protect hands from splinters, rust, or sharp edges.
- Locate and avoid all electrical wiring or conduits near the hanger.
- Never attempt repairs if the ceiling structure itself appears damaged or unstable.
- Ensure the hanger is completely empty before performing any checks or fixes.
Tools you may need
- Sturdy ladder
- Screwdriver set (Phillips and flathead)
- Wrench or spanner (if bolts are used)
- Pliers
- Lubricant spray (e.g., WD-40)
- Strong replacement rope or string (if needed)
- Flashlight (for better visibility)
Step-by-step
Step 1
Prepare the Area: Ensure the hanger is completely empty. Place your sturdy ladder directly beneath the hanger.
Step 2
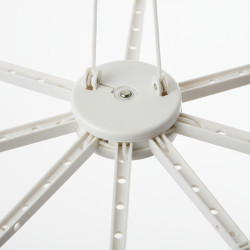
Initial Visual Inspection: Carefully ascend the ladder and visually inspect the entire hanger structure. Look for obvious signs of damage, cracks, rust, or significant wear on any part.
Step 3
Check Mounting Points: Examine all screws, bolts, and brackets attaching the hanger to the ceiling. Confirm they are tightly secured and show no signs of pulling away from the ceiling. If ceiling damage is observed, stop and consult ‘When to Call a Pro’.
Step 4
Inspect Ropes/Chains/Wires: Thoroughly check all ropes, chains, or wires for fraying, cuts, rust, kinks, or any weak spots. Test their tension and integrity.
Step 5
Examine Pulleys/Moving Parts: Inspect any pulleys, wheels, or moving joints. Ensure they operate smoothly without grinding, squeaking, or sticking. Check for cracks, bends, or blockages.
Step 6
Assess Overall Stability: Gently and firmly wiggle the entire hanger structure. It should feel stable and securely anchored with minimal movement. If there’s excessive wobbling or creaking from the ceiling, stop and consult ‘When to Call a Pro’.
Step 7
Tighten Loose Fasteners: Using the appropriate screwdriver or wrench, carefully tighten any loose screws or bolts found during your inspection. Avoid overtightening, which can strip threads or damage the material.
Step 8
Replace Damaged Components: If ropes, chains, or smaller hardware (like S-hooks or rings) are significantly worn or damaged, replace them with new, strong materials suitable for the hanger’s weight capacity.
Step 9
Lubricate Moving Parts: Apply a small amount of lubricant spray to any squeaky or stiff pulleys, joints, or other moving parts to restore smooth operation.
Step 10
Final Safety Check: Once repairs are complete, perform another quick visual and stability check before loading the hanger with clothes.
Common mistakes
- Neglecting small issues like minor fraying or loose screws, allowing them to escalate into serious safety hazards.
- Exceeding the hanger’s weight capacity, which strains the entire structure and mounting points.
- Using low-quality or incorrect replacement materials that fail prematurely.
- Attempting quick fixes without the right tools or proper safety equipment (e.g., a stable ladder).
- Failing to inspect the ceiling itself for structural integrity before or during repairs.
- Overtightening screws, which can strip threads or crack the material.
When to call a professional
- If the mounting points in the ceiling itself are damaged, cracked, or crumbling.
- If the main structural components of the hanger are bent, broken, or rusted beyond simple repair.
- If you are unsure how to safely perform a repair or lack the necessary tools.
- If there are any concerns about electrical wiring being too close or affected by the hanger.
- For complex installations, major replacements, or if the hanger repeatedly fails after quick fixes.
Want this done properly without the hassle?
Aap DIY try kar sakte hain, lekin agar time nahi ya confidence kam ho, to professional bula lena better hota hai. Galat step se damage ya safety issue ho sakta hai.