How to do a basic Door Stopper Installation safety check and quick fixes
Want this done properly without the hassle?
Aap DIY try kar sakte hain, lekin agar time nahi ya confidence kam ho, to professional bula lena better hota hai. Galat step se damage ya safety issue ho sakta hai.
Quick answer (read this first)
- Check for loose or damaged door stoppers.
- Inspect rubber tips for wear and tear.
- Tighten any loose mounting screws.
- Replace missing or severely damaged parts.
- Ensure the stopper provides adequate wall clearance.
Safety first
- Wear safety glasses if using power tools.
- Keep small hardware away from children and pets.
- Avoid overtightening screws to prevent stripping.
- Be mindful of your grip to avoid pinching fingers.
- Ensure proper ventilation if using adhesives.
Tools you may need
- Screwdriver (Phillips and/or Flathead)
- Pliers (optional, for removing stubborn parts)
- Measuring tape
- Pencil
- Drill with appropriate bits (if installing a new stopper or pilot holes)
- Replacement door stoppers or rubber tips
Step-by-step
Step 1
Thoroughly inspect all existing door stoppers. Look for visible damage, missing rubber tips, rust, or any signs of looseness in both wall-mounted and floor-mounted types.
Step 2
Gently push the door open until it makes contact with the stopper. Observe if the stopper moves, wobbles, or if the door impacts the wall regardless of the stopper. Ensure the stopper is properly aligned with the door knob’s impact point.
Step 3
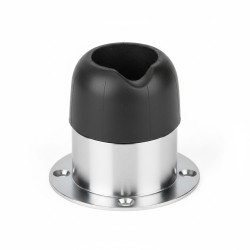
Examine the rubber tip or cap on each stopper. It should be soft and fully intact to absorb impact. If it’s hard, cracked, missing, or severely worn, it needs replacement.
Step 4
For any wobbly or loose stoppers, use a screwdriver to carefully tighten the mounting screws. If screws spin freely, the existing anchor might be stripped, indicating a need for a larger screw or a new anchor system.
Step 5
If rubber tips are worn or missing, carefully pry off the old one and replace it with a new, correctly sized tip. For severely damaged or missing stoppers, proceed to install a new one.
Step 6
If installing a new stopper, hold it in the desired position (aligned with the doorknob for wall stoppers, or discreetly on the floor). Mark the screw points with a pencil. Drill pilot holes carefully to avoid hitting wiring or plumbing, then secure the new stopper with screws.
Step 7
Once fixes or replacements are complete, gently open the door to let it meet the stopper. Confirm that the door makes contact properly, the stopper holds firm, and the wall is protected from impact.
Common mistakes
- Ignoring loose stoppers, which can lead to extensive wall damage.
- Using incorrect size screws or anchors, leading to unstable installation.
- Not replacing worn rubber tips, reducing the stopper’s effectiveness.
- Overtightening screws and stripping the threads or damaging the wall/floor.
- Installing the stopper in an incorrect position, failing to protect the door or wall.
When to call a professional
- If existing anchors are stripped and you’re unsure how to repair them.
- If you encounter wiring or plumbing behind the wall during installation attempts.
- If the door or wall has sustained significant damage that requires professional repair.
- If you lack the necessary tools or confidence to perform the repairs safely.
- If the issue persists despite multiple attempts at basic fixes.
Want this done properly without the hassle?
Aap DIY try kar sakte hain, lekin agar time nahi ya confidence kam ho, to professional bula lena better hota hai. Galat step se damage ya safety issue ho sakta hai.