How to do a basic Drawer Channel Replacement safety check and quick fixes
Want this done properly without the hassle?
Aap DIY try kar sakte hain, lekin agar time nahi ya confidence kam ho, to professional bula lena better hota hai. Galat step se damage ya safety issue ho sakta hai.
Quick answer (read this first)
- Safely empty and remove the drawer.
- Inspect channels for damage, wear, or loose fittings.
- Clean channels meticulously to remove dirt and debris.
- Tighten all loose screws on both drawer and cabinet channels.
- Apply appropriate lubricant to ensure smooth movement.
- Reinstall and test the drawer, assessing if replacement is needed.
Safety first
- Clear your workspace and ensure good lighting to prevent accidents.
- Always wear protective gloves to guard against splinters, sharp metal edges, or rust.
- Handle the drawer carefully during removal and reinstallation to avoid dropping it or pinching fingers.
- Ensure the cabinet is stable and won’t tip over while the drawer is out.
- If channels are severely rusted or sharp, consider professional help rather than attempting to force them.
Tools you may need
- Screwdriver set (Phillips and flathead)
- Cleaning cloth or brush
- Silicone spray lubricant (or dry lubricant)
- Measuring tape
- New drawer channels (if replacement is needed)
- Pencil (for marking)
Step-by-step
Step 1
First, completely empty the drawer of its contents. Carefully pull the drawer out until it reaches its stop. For most channels, gently lift the front of the drawer and pull further to disengage it. Ball-bearing channels often have small plastic levers on each side that need to be pressed simultaneously to release the drawer.
Step 2
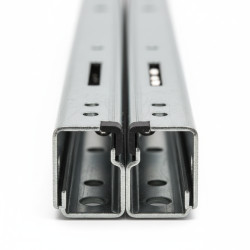
Thoroughly inspect both the drawer-mounted channels and the cabinet-mounted channels. Look for visible signs of damage such as bends, dents, severe rust, or missing ball bearings. Also, identify any loose, stripped, or missing screws on both channel sets and the drawer box itself.
Step 3
Using a dry cleaning cloth, an old toothbrush, or a small brush, meticulously remove all accumulated dust, dirt, hair, and debris from inside and around both sets of channels. Ensure the tracks are completely clear of any obstructions.
Step 4
With the appropriate Phillips or flathead screwdriver, carefully tighten all loose screws identified in step 2. Apply gentle pressure and avoid overtightening, which can strip the screw holes in the wood or particle board.
Step 5
Apply a light, even coat of silicone spray or a specialized dry lubricant along the moving parts of the channels. Focus on the rollers or ball bearings. Crucially, avoid oil-based lubricants, which can attract dust and grime, worsening the problem over time.
Step 6
Carefully align the drawer with the cabinet channels and gently slide it back into place. Ensure both sides engage properly. Push the drawer fully in and pull it out several times to test for smooth, quiet operation. Check for any remaining sticking points.
Step 7
If, after performing all these quick fixes, the drawer continues to stick, jam, or feels unstable, the channels are likely damaged beyond simple repair. At this point, measure the length and width of the existing channels to purchase suitable replacements. Consider contacting a professional if unsure about replacement.
Common mistakes
- Applying inappropriate lubricants (e.g., oil) that attract dust and worsen friction.
- Overtightening screws, leading to stripped wood or damaged channels.
- Neglecting thorough cleaning before lubrication, leaving debris to cause new problems.
- Ignoring obvious physical damage like severe bends or rust, expecting quick fixes to resolve structural issues.
- Forcing a stuck drawer, which can cause irreversible damage to channels or the drawer box.
When to call a professional
- The drawer channels are severely bent, broken, or rusted beyond what quick fixes can remedy.
- You encounter difficulty in safely removing or reinstalling the drawer without causing further damage.
- The drawer box itself is damaged, warped, or misaligned, requiring carpentry skills.
- You do not possess the necessary tools, replacement parts, or confidence to complete the repair.
- Despite following all troubleshooting steps, the drawer still malfunctions or remains unstable.
Want this done properly without the hassle?
Aap DIY try kar sakte hain, lekin agar time nahi ya confidence kam ho, to professional bula lena better hota hai. Galat step se damage ya safety issue ho sakta hai.