How to Do a Basic Furniture Touch Up
Want this done properly without the hassle?
Aap DIY try kar sakte hain, lekin agar time nahi ya confidence kam ho, to professional bula lena better hota hai. Galat step se damage ya safety issue ho sakta hai.
Starting from
Rs. 1000
Quick answer (read this first)
- Inspect furniture for minor damage like scratches or scuffs.
- Clean and prepare the surface properly.
- Select the right touch-up tools and materials.
- Carefully apply wood filler, stain, or polish.
- Ensure sufficient drying time between applications for best results.
- Finish with a protective layer for lasting shine.
Safety first
- Work in a well-ventilated area.
- Wear gloves to protect hands.
- Keep children and pets away from chemicals.
- Read product labels for specific safety instructions.
- Dispose of rags properly to prevent fire hazards.
Tools you may need
- Microfiber cloths or soft rags
- Wood cleaner or mild soap
- Fine-grit sandpaper (220-320 grit)
- Wood filler or putty
- Wood stain markers or touch-up pens
- Clear lacquer or furniture polish
- Small brush or cotton swabs
Step-by-step
Step 1
- Clean the Surface: Start by thoroughly cleaning the furniture with a mild wood cleaner or a damp cloth to remove all dust, grime, and old polish. Ensure the surface is completely dry before proceeding.
Step 2
- Assess Damage & Prepare: Carefully inspect the furniture to identify minor scratches, scuffs, or faded spots. For very shallow scratches or rough edges, gently sand the affected area with fine-grit (220-320) sandpaper, always moving with the wood grain.
Step 3
- Fill Minor Imperfections: Apply a small amount of wood filler or putty to any small dents, chips, or holes using a putty knife or your finger. Allow it to dry fully as per product instructions, then gently sand the filled area smooth and flush with the surrounding surface.
Step 4
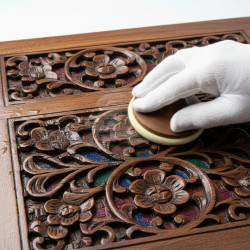
- Match & Apply Color/Stain: Select a wood stain marker or touch-up pen that closely matches your furniture’s existing finish. Apply a very thin, light coat to the repaired or faded area, blending gently outwards to avoid harsh lines.
Step 5
- Build Color Gradually: If the first application is too light, allow it to dry completely. Then, apply additional thin layers, one at a time, until the color seamlessly matches the surrounding wood. Patience is key here.
Step 6
- Seal and Protect: Once the touched-up area is completely dry and the color is satisfactory, apply a clear protective finish like furniture polish or a thin coat of clear lacquer. This helps seal the repair and adds durability.
Step 7
- Buff for Uniform Finish: Buff the entire furniture piece gently with a clean, soft cloth to achieve an even sheen and blend the repaired area with the rest of the surface, ensuring a consistent look.
Common mistakes
- Not cleaning the surface beforehand.
- Using too much product at once.
- Not matching the color accurately.
- Sanding against the wood grain.
- Rushing the drying process between coats.
- Ignoring product instructions.
When to call a professional
- Extensive structural damage or broken parts.
- Large, deep gouges or missing wood sections.
- When dealing with antique or valuable furniture.
- If you are unsure about the type of wood or finish.
- When the damage requires specialized tools or expertise.
Want this done properly without the hassle?
Aap DIY try kar sakte hain, lekin agar time nahi ya confidence kam ho, to professional bula lena better hota hai. Galat step se damage ya safety issue ho sakta hai.
Starting from
Rs. 1000
100% Money Back Guarantee
If you are not satisfied with the service