How to do a Basic Geyser Service Safety Check and Quick Fixes
Want this done properly without the hassle?
Aap DIY try kar sakte hain, lekin agar time nahi ya confidence kam ho, to professional bula lena better hota hai. Galat step se damage ya safety issue ho sakta hai.
Quick answer (read this first)
- Regularly check for leaks and corrosion.
- Test the pressure relief valve annually.
- Briefly drain sediment to improve efficiency.
- Ensure proper ventilation for gas geysers.
- Always turn off power/gas before any inspection.
Safety first
- Always turn off the main electrical breaker or the gas supply valve to the geyser before starting any work.
- For gas geysers, ensure the area is well-ventilated and never ignore the smell of gas; evacuate and call a professional immediately.
- Do not attempt any electrical repairs if you are not qualified; severe shock or fire hazards can occur.
- Wear protective gloves and eyewear, especially when dealing with hot water or rusty components.
- Be cautious of hot water when testing the pressure relief valve or draining the tank.
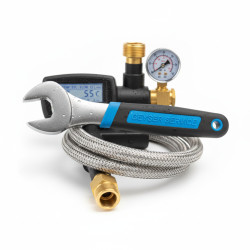
Tools you may need
- Screwdriver (flathead and Phillips)
- Adjustable wrench
- Bucket or pan
- Old cloths or towels
- Soft brush or cloth for cleaning
Step-by-step
Step 1
Cut Off Power/Gas Supply: Before any inspection, locate and turn off the main electrical breaker for electric geysers or the gas shut-off valve for gas geysers. Verify the supply is completely off.
Step 2
Inspect for Leaks and Rust: Thoroughly examine the geyser’s exterior, all connecting pipes, and the floor area for any signs of water leaks, drips, corrosion, or rust buildup. Pay attention to the top, bottom, and valve connections.
Step 3
Test the Pressure Relief Valve (PRV): Place a bucket beneath the PRV’s discharge pipe. Gently lift and quickly release the test lever on the valve. A small amount of water should flow out and stop. This confirms the valve is not seized.
Step 4
Perform a Partial Sediment Flush: Connect a garden hose to the drain valve at the bottom of the geyser or place a large bucket. Open the drain valve for 1-2 minutes to flush out accumulated sediment, then close it. This improves heating efficiency.
Step 5
Visually Check Connections & Vents: For gas geysers, visually inspect the gas line for damage or loose fittings and ensure all vents are clear of obstructions. For electric geysers, check the power cord and visible wiring for fraying, burn marks, or loose connections (do not touch wiring).
Step 6
Clean Exterior and Clear Airflow: Use a soft brush or cloth to clean the geyser’s outer casing. For gas geysers, ensure air intake and exhaust vents are completely free of dust, cobwebs, or debris to ensure proper combustion and prevent carbon monoxide buildup.
Step 7
Restore Supply and Monitor: Close the drain valve completely. Restore the electrical or gas supply to the geyser. Listen for normal operation, check for any new leaks, and ensure the geyser begins to heat water as expected. Observe for 10-15 minutes.
Common mistakes
- Ignoring small leaks, which can lead to significant damage or higher utility bills.
- Failing to turn off the power/gas supply before beginning inspection or maintenance.
- Attempting complex repairs or internal electrical work without professional expertise.
- Not ensuring proper ventilation for gas geysers, risking carbon monoxide buildup.
- Forgetting to check the pressure relief valve, which is critical for safety.
When to call a professional
- If you detect a gas smell, even faint, around your gas geyser.
- If there are persistent water leaks that you cannot easily identify or fix.
- If the geyser is not heating water effectively or at all after basic checks.
- If you notice any electrical issues like flickering lights, tripping breakers, or burning smells from an electric geyser.
- If the pressure relief valve continuously drips or doesn’t release water when tested.
- For any major repairs or internal component replacements.
Want this done properly without the hassle?
Aap DIY try kar sakte hain, lekin agar time nahi ya confidence kam ho, to professional bula lena better hota hai. Galat step se damage ya safety issue ho sakta hai.


