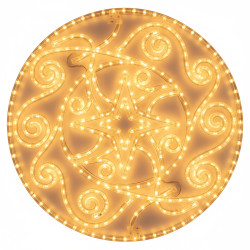
How to Troubleshoot Rope Light Installation Issues at Home
Want this done properly without the hassle?
Aap DIY try kar sakte hain, lekin agar time nahi ya confidence kam ho, to professional bula lena better hota hai. Galat step se damage ya safety issue ho sakta hai.
Starting from
Rs. 800
Quick answer (read this first)
- Verify the wall outlet is working and the rope light’s plug is secure.
- Examine all connections, adapters, and the rope light’s length for visible damage or loose wiring.
- Check for blown fuses in the plug or adapter, replacing them with the correct rating.
- Use a multimeter if comfortable, to test for continuity and pinpoint electrical interruptions.
- If modular, isolate faulty sections by disconnecting them one by one.
Safety first
- Always disconnect power from the rope light at the outlet before any inspection or repair.
- Never handle electrical components with wet hands or in damp environments to prevent electric shock.
- Utilize only insulated tools when working with wiring or connectors.
- Avoid direct contact with exposed wires or significantly damaged sections of the rope light.
- Ensure the rope light’s voltage matches your power supply and do not overload electrical circuits.
- If water intrusion is suspected, immediately discontinue use and do not attempt repair.
Tools you may need
- Basic hand tools (screwdrivers, pliers)
- Electrical insulation tape
- Wire cutters/strippers (for minor cable repairs)
- Multimeter or voltage tester (recommended for detailed diagnostics)
- Flashlight or headlamp (for better visibility)
- Replacement fuses (if your rope light system uses them)
- Known-working appliance (to test outlets)
Step-by-step
Step 1
- Ensure Safety First: Before touching any part of the rope light, unplug it completely from the wall outlet. Gather all necessary tools and ensure your hands are dry and you are working in a safe, non-damp environment.
Step 2
- Verify Power Source and Plug: Plug a different, known-working appliance into the same wall outlet to confirm it’s supplying power. If the outlet is working, securely plug in your rope light. Inspect the rope light’s plug for any visible damage, bent prongs, or signs of burning.
Step 3
- Inspect All Connections: Carefully check all adapters, end caps, and connectors along the rope light’s length. Ensure they are firmly seated, not loose, and free from corrosion, discoloration, or signs of burning. Loose connections are a common cause of intermittent lighting.
Step 4
- Look for Physical Damage: Methodically unroll and inspect the entire rope light for any cuts, kinks, abrasions, or visible breaks in the outer casing. Pay close attention to areas that bend frequently or are exposed to elements. Even minor damage can interrupt the internal wiring.
Step 5
- Test Internal Fuses (If Applicable): Many rope light power cords or adapters contain a small fuse. Locate it (often within the plug), carefully remove it, and inspect the thin wire filament inside. If it’s broken, replace it with a fuse of the exact same amperage and voltage rating. Never use a higher-rated fuse.
Step 6
- Check for Water Intrusion: If your rope lights are installed outdoors or in damp areas, inspect for any signs of water inside the rope light’s casing or connectors. Water can cause short circuits and irreparable damage. If water is present, discontinue use immediately and do not attempt repair.
Step 7
- Isolate Faulty Sections (Modular Lights): For rope light systems that allow sections to be connected or disconnected, try removing sections one by one. Reconnect the power (briefly and safely) after each disconnection to identify which specific section is causing the entire system to fail. This helps pinpoint a faulty module or connector.
Step 8
- Advanced: Use a Multimeter for Continuity (Optional): If you are comfortable and have a multimeter, set it to continuity mode. With the rope light unplugged, test different sections by placing probes on the live and neutral pins (or along exposed internal wires if accessible). A lack of continuity indicates a break in that specific section. If you are unsure how to use a multimeter safely, skip this step.
Common mistakes
- Failing to disconnect the rope light from its power source before attempting any inspection or repair.
- Ignoring minor physical damage like small cuts, nicks, or kinks in the rope light’s casing, which can hide internal wire breaks.
- Using a replacement fuse with an incorrect amperage rating, which can cause further damage or create a fire hazard.
- Assuming the rope light is faulty without first verifying that the wall outlet itself is functioning correctly.
- Forcing misaligned, corroded, or damaged connectors together, potentially causing more extensive damage.
- Attempting to repair severely damaged or water-logged sections of the rope light instead of considering replacement.
When to call a professional
- If you feel uncomfortable or lack confidence in performing any electrical diagnostic or repair steps yourself.
- If the problem extends beyond the rope light itself to your home’s main electrical wiring, circuit breaker, or wall outlet.
- When you observe sparks, hear crackling noises, smell burning, or experience repeated circuit breaker trips.
- If the rope light is extensively damaged, visibly melted, water-logged, or requires intricate repairs beyond simple connection fixes.
- If all basic troubleshooting steps have been carefully followed, and the rope light still fails to function correctly.
Want this done properly without the hassle?
Aap DIY try kar sakte hain, lekin agar time nahi ya confidence kam ho, to professional bula lena better hota hai. Galat step se damage ya safety issue ho sakta hai.
Starting from
Rs. 800
100% Money Back Guarantee
If you are not satisfied with the service