How to Troubleshoot SMD Downlight Installation Issues at Home
Want this done properly without the hassle?
Aap DIY try kar sakte hain, lekin agar time nahi ya confidence kam ho, to professional bula lena better hota hai. Galat step se damage ya safety issue ho sakta hai.
Quick answer (read this first)
- Always turn off power at the breaker first.
- Verify the main power supply and wall switches are functional.
- Examine all wiring connections for looseness, damage, or corrosion.
- Test the SMD downlight unit and its driver (if separate) for faults.
- Confirm all components (downlight, driver) are compatible with your electrical system.
Safety first
- Always turn off the main power at the circuit breaker before beginning any work.
- Use insulated tools to prevent accidental shocks.
- Never touch bare wires when power is on.
- Ensure your workspace is dry and well-lit.
- If you are unsure or uncomfortable at any point, stop and call a professional.
Tools you may need
- Voltage tester or multimeter
- Screwdriver set (Phillips and Flathead)
- Wire strippers/cutters
- Insulation tape
- Ladder (if accessing high ceilings)
Step-by-step
Step 1
Safety First: Disconnect Power. Go to your main circuit breaker and switch off the power to the specific lighting circuit. Use a voltage tester to confirm no power is present at the downlight’s location before proceeding.
Step 2
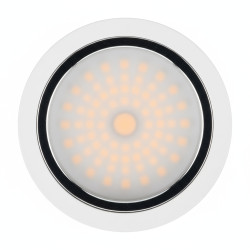
Examine the Downlight Unit. Carefully remove the SMD downlight from its ceiling housing. Look for any visible physical damage to the light fixture itself, its connections, or the spring clips.
Step 3
Inspect Wiring Connections. Thoroughly check all wires connected to the downlight and within the junction box. Ensure connections are tight, not frayed, corroded, or showing signs of burning.
Step 4
Verify Power Supply to Fixture. With the downlight disconnected and safely set aside, briefly turn on the circuit breaker. Use a voltage tester to confirm that power is reaching the fixture’s wiring. Immediately turn the circuit breaker OFF again after testing.
Step 5
Test the Downlight and Driver. If power is confirmed at the fixture, connect the suspect downlight (and its external driver, if applicable) to a known working power source or another compatible fixture. This helps isolate if the downlight or driver is the faulty component.
Step 6
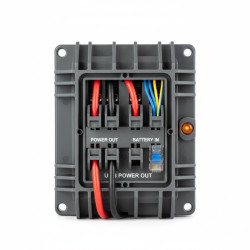
Check for Overheating or Component Failure. Inspect the downlight’s driver (transformer) for any visual signs of damage like bulging, scorching, or a distinct burnt smell. A faulty driver is a very common cause of downlight issues.
Step 7
Assess for Incompatibility. Confirm that the SMD downlight’s wattage and voltage requirements perfectly match its driver and your home’s electrical supply. Incompatible components can cause flickering or complete failure.
Step 8
Secure and Test. Once you have resolved an issue (e.g., tightened a loose wire, replaced a faulty component), carefully re-connect all wiring. Ensure secure connections, then restore power at the circuit breaker and check if the downlight now functions correctly.
Common mistakes
- Forgetting to turn off the main power, leading to shock hazards.
- Incorrectly stripping or connecting wires, causing short circuits.
- Assuming the downlight is faulty without checking the power supply.
- Using incompatible drivers or power supplies for the SMD downlight.
- Ignoring signs of burnt wires, components, or unusual smells.
When to call a professional
- If you are uncomfortable or lack experience working with electrical components.
- When the problem involves the main circuit breaker or home electrical panel.
- If you detect persistent burning smells, smoke, or sparks.
- When troubleshooting steps do not resolve the issue, indicating a deeper problem.
- If complex wiring diagrams or circuit diagnostics are required to find the fault.
Want this done properly without the hassle?
Aap DIY try kar sakte hain, lekin agar time nahi ya confidence kam ho, to professional bula lena better hota hai. Galat step se damage ya safety issue ho sakta hai.