How to Do a Basic Distribution Box Safety Check and Quick Fixes
Want this done properly without the hassle?
Aap DIY try kar sakte hain, lekin agar time nahi ya confidence kam ho, to professional bula lena better hota hai. Galat step se damage ya safety issue ho sakta hai.
Quick answer (read this first)
- Regularly inspect for loose wires or burnt smells.
- Ensure all breakers are clearly labeled.
- Test circuit breakers periodically.
- Never overload circuits.
Safety first
- Always turn off the main power supply before touching the distribution box.
- Use insulated tools and wear non-conductive shoes.
- Never touch bare wires or work with wet hands.
- Ensure hands are dry and stand on a dry, non-conductive surface.
- Do not attempt repairs beyond basic checks if unsure.
- Call a qualified electrician immediately if you encounter anything beyond simple checks or feel uncertain.
Tools you may need
- Screwdriver set (insulated preferred)
- Multimeter or voltage tester
- Flashlight
- Insulated gloves (optional but recommended)
- Non-conductive shoes
Step-by-step
Step 1
Prioritize Safety - Cut Main Power: Locate your home’s main circuit breaker and switch it to the ‘OFF’ position. Confirm power is completely off using a voltage tester on accessible outlets to ensure no current is flowing before touching the distribution box.
Step 2
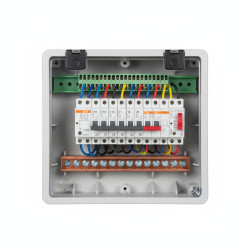
Perform External Visual Inspection: Before opening the box, check its exterior for any visible damage, charring, signs of moisture, or unusual noises or smells coming from within.
Step 3
Open and Conduct Internal Visual Scan: Carefully open the distribution box cover. Look for any signs of burning, melted plastic, discolored wires, loose debris, or pest intrusion. Note any irregularities.
Step 4
Examine Circuit Breaker Conditions: Inspect each individual circuit breaker. Ensure they are firmly seated and not loose or wobbly. Look for any visible cracks, discoloration, or burnt marks on the breakers themselves.
Step 5
Gently Check Wire Connections: Using only an insulated screwdriver, gently test if the terminal screws holding wires are tight. Do NOT overtighten or force them. If you notice significant looseness or burn marks around connections, do NOT attempt to tighten; call a professional.
Step 6
Verify Circuit Labeling: Confirm that all circuit breakers are correctly labeled for the specific areas or appliances they control. Clear labeling is crucial for quick troubleshooting. Correct any missing or inaccurate labels.
Step 7
Test Breaker Functionality (Safely): Carefully close the distribution box cover. Switch the main breaker back to ‘ON’. Then, one by one, flip each individual circuit breaker from ‘OFF’ to ‘ON’. If any breaker trips immediately, switch it ‘OFF’ and there is a fault in that specific circuit; do not attempt to reset it multiple times.
Step 8
Secure and Restore Full Power: Once all checks and quick fixes (like labeling) are complete, ensure the distribution box cover is securely fastened. Confirm power is restored throughout your home.
Common mistakes
- Not turning off main power before inspection.
- Using non-insulated tools or working with wet hands.
- Ignoring unusual smells, sounds, or visible damage from the box.
- Overloading circuits by plugging too many devices into one outlet.
- Attempting complex repairs or wiring changes without professional knowledge.
When to call a professional
- If you see sparks, smoke, or burnt wiring.
- If a circuit breaker repeatedly trips or won’t reset.
- If you find any melted components, strong burning smells, or excessive heat.
- If you are unsure about any step, feel uncomfortable, or encounter issues beyond basic checks.
- For any new installations, major wiring changes, or if your box feels hot to the touch.
Want this done properly without the hassle?
Aap DIY try kar sakte hain, lekin agar time nahi ya confidence kam ho, to professional bula lena better hota hai. Galat step se damage ya safety issue ho sakta hai.