How to do a basic Led Tv Mounting 32-42 safety check and quick fixes
Want this done properly without the hassle?
Aap DIY try kar sakte hain, lekin agar time nahi ya confidence kam ho, to professional bula lena better hota hai. Galat step se damage ya safety issue ho sakta hai.
Quick answer (read this first)
- Regularly inspect your LED TV mount for stability.
- Examine all cables for any signs of wear or damage.
- Ensure the TV’s ventilation is unobstructed.
- Tighten any loose mount screws promptly.
Safety first
- Always disconnect the TV from the main power supply before any inspection or adjustment.
- Never touch exposed electrical wires; immediately call a professional if you see any.
- Avoid overtightening screws, particularly those securing the TV to the bracket, to prevent damage.
- Do not attempt to repair internal TV components; this requires professional expertise.
- Use a sturdy and stable ladder when accessing high-mounted TVs to prevent falls.
Tools you may need
- Screwdriver set (Phillips and Flathead)
- Spirit level or smartphone level app
- Soft, dry microfiber cloth
- Cable ties or velcro straps
- Small flashlight (for inspecting hidden areas)
Step-by-step
Step 1
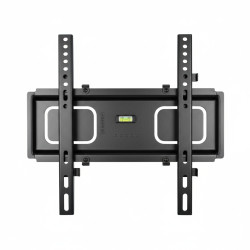
Power Down & Initial Visual Check: Unplug your TV from the wall outlet. Carefully examine the entire mount for any visible cracks, bends, rust, or signs of stress on the bracket or wall.
Step 2
Test Mount Stability: Gently grasp the TV by its sides and attempt to rock it slightly, both up-down and side-to-side. The TV and mount should feel solid and not exhibit excessive wobbling.
Step 3
Tighten Wall and TV Screws: Inspect all screws securing the mount to the wall. Using the appropriate screwdriver, gently tighten any that feel loose, ensuring not to strip them. Then, check and tighten the screws that attach the TV to its mounting bracket, being careful not to overtighten.
Step 4
Inspect All Cables: Trace all connected cables (power, HDMI, audio, antenna) from the TV to their respective sources. Look for any fraying, cuts, kinks, pinching, or exposed wires. Ensure they are not under tension.
Step 5
Organize Cables & Check Ventilation: Use cable ties or velcro straps to neatly bundle and secure any loose or dangling cables. Confirm that the TV’s ventilation ports are completely unobstructed by the wall, cables, or other objects to prevent overheating.
Step 6
Clean & Power On: Gently clean the TV screen, frame, and exposed mount surfaces with a soft, dry cloth to remove dust. Once all checks and minor adjustments are complete, plug the TV back into the power outlet and turn it on to confirm functionality.
Common mistakes
- Neglecting even minor wobbles or instability in the mount.
- Using screwdrivers or screws that are not suitable for the mount or TV, potentially causing damage.
- Leaving power or signal cables hanging loosely or in a way that creates a tripping hazard.
- Allowing dust or obstructions to block the TV’s essential ventilation ports, leading to overheating.
- Trying to repair complex electrical faults or internal TV components without professional training.
When to call a professional
- If the TV wall mount shows significant cracks, bends, or structural damage.
- If the TV continues to wobble or feel unstable even after checking and tightening all screws.
- If you notice sparks, burning smells, or any other serious electrical issues near the TV or outlet.
- If the wall itself appears damaged, soft, or unsuitable for supporting the TV mount.
- If you hear persistent unusual noises emanating from the TV or its mounting area.
- If you need to relocate the TV mount and are unsure about the proper installation process for a new spot.
Want this done properly without the hassle?
Aap DIY try kar sakte hain, lekin agar time nahi ya confidence kam ho, to professional bula lena better hota hai. Galat step se damage ya safety issue ho sakta hai.