How to do a basic Power Plug Installation safety check and quick fixes

Want this done properly without the hassle?
Aap DIY try kar sakte hain, lekin agar time nahi ya confidence kam ho, to professional bula lena better hota hai. Galat step se damage ya safety issue ho sakta hai.
Quick answer (read this first)
- Switch off power at the main breaker before any inspection.
- Look for visual damage: burnt marks, melted plastic, or frayed wires.
- Confirm the earthing connection is secure and properly installed.
- Immediately replace any damaged or faulty power plugs or wall sockets.
- Never overload an outlet with too many appliances to prevent overheating.
Safety first
- Always turn off the main circuit breaker or the specific circuit before starting any work.
- Never touch bare wires with wet hands or while standing in water.
- Use insulated tools to prevent accidental shocks.
- Do not attempt repairs beyond your comfort or skill level.
- Keep children and pets away from the work area.
Tools you may need
- Screwdriver set (flathead and Phillips)
- Electrical tape
- Wire stripper (optional but useful)
- Voltage tester (optional but recommended)
- New power plug or socket (if replacement is needed)
Step-by-step
Step 1
Power Off Safely: Locate your main distribution board. Switch off the power supply to the specific socket circuit or the entire house. Always double-check that the power is off before proceeding.
Step 2
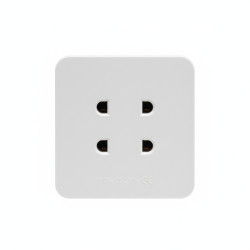
Access the Plug/Socket: Carefully unscrew and remove the cover plate of the power plug or wall socket you intend to inspect.
Step 3
Perform Visual Inspection: Look for any signs of damage, such as burnt marks or discoloration, melted or cracked plastic on the body, frayed or exposed wires, or any unusual smells.
Step 4
Check for Loose Connections: Gently pull on each individual wire connected to the terminals (Live, Neutral, Earth) to check if they are loose. If a wire feels loose, use an insulated screwdriver to carefully tighten its terminal screw. Ensure no stray wire strands are touching other terminals.
Step 5
Verify Wiring Polarity: Confirm that the Live wire (typically brown or red in Pakistan) is connected to the ‘L’ terminal, the Neutral wire (blue or black) to the ‘N’ terminal, and the Earth wire (green and yellow striped) is securely connected to the ‘E’ or earth terminal. This is crucial for safety.
Step 6
Address Minor Wire Damage (If Applicable): If you find minor insulation damage near a terminal, carefully trim the damaged section, strip about 1/2 inch of fresh insulation, and reconnect the wire securely. If damage is extensive or you are unsure, replace the entire plug/socket.
Step 7
Secure and Test: Once all connections are secure and inspected, carefully reattach the cover plate, ensuring no wires are pinched. Return to the main distribution board and restore power to the circuit. Test the socket using a low-power appliance to confirm it functions correctly and safely.
Common mistakes
- Forgetting to switch off the main power before starting work.
- Using uninsulated tools, which can lead to electric shock.
- Ignoring loose connections, which can cause overheating and fire hazards.
- Overloading a single socket with too many high-power appliances.
- Improperly connecting or omitting the earth wire, compromising safety features.
When to call a professional
- If the circuit breaker frequently trips without an obvious reason.
- If you observe sparks, smoke, or a burning smell from outlets or switches.
- If lights consistently flicker or dim throughout your home.
- If you experience a shocking sensation when touching appliances or switches.
- If you are unsure about any step or encounter complex wiring issues.
- For new electrical installations, major rewiring, or upgrades to your electrical system.
Want this done properly without the hassle?
Aap DIY try kar sakte hain, lekin agar time nahi ya confidence kam ho, to professional bula lena better hota hai. Galat step se damage ya safety issue ho sakta hai.