How to do a basic AC R410 Inverter Safety Check and Quick Fixes
Want this done properly without the hassle?
Aap DIY try kar sakte hain, lekin agar time nahi ya confidence kam ho, to professional bula lena better hota hai. Galat step se damage ya safety issue ho sakta hai.
Quick answer (read this first)
- Always turn off AC power before any inspection.
- Regularly clean air filters for optimal performance.
- Check for blockages around the outdoor unit.
- Ensure proper drainage to prevent water leaks.
Safety first
- Always cut power: Turn off the main circuit breaker for your AC unit before attempting any inspection or cleaning to prevent electric shock.
- Wear protective gear: Use gloves and eye protection when cleaning or handling components.
- Never tamper with electricals: Do not touch any exposed wires or electrical components. If you see damaged wiring, call a professional immediately.
- Refrigerant hazard: Avoid direct contact with refrigerant lines, especially if you suspect a leak, as the gas is under pressure and can cause severe frostbite.
Tools you may need
- Screwdriver (Philips and flathead)
- Soft brush or vacuum cleaner
- Microfiber cloth
- Flashlight
- Water hose (for outdoor unit)
Step-by-step
Step 1
Power Down Safely: Always start by locating and switching off the main circuit breaker for your AC unit to ensure no electrical hazards.
Step 2
Clean Air Filters: Open the indoor unit’s front panel. Remove and thoroughly wash the air filters with mild soap and water. Allow them to dry completely before re-inserting to improve airflow and efficiency.
Step 3
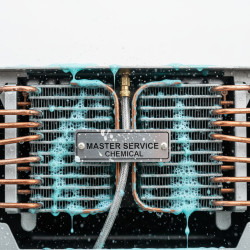
Inspect Outdoor Unit for Debris: Visually check the outdoor condenser unit. Remove any leaves, dirt, plastic bags, or other obstructions around the coils. If heavily soiled, gently rinse the coils with a garden hose (ensure power is still off).
Step 4
Clear Drainage Pipe: Locate the condensate drain pipe (usually a PVC pipe leading from the indoor unit outdoors). Check for and clear any visible blockages or standing water to prevent leaks and mold.
Step 5
Check for Ice Formation: Open the indoor unit and inspect the evaporator coil and refrigerant lines for any ice buildup. Ice often indicates restricted airflow (dirty filter) or low refrigerant. If you see ice, turn off the AC and let it thaw, then repeat steps 2-4.
Step 6
Verify Remote Control Settings: Ensure your AC remote is set to ‘Cool’ mode, and the temperature is set several degrees lower than the current room temperature. Incorrect settings are a common cause of poor cooling.
Step 7
Listen for Abnormal Noises: After turning the power back on, listen carefully when the AC starts. Grinding, hissing, loud buzzing, or excessive vibrations can signal mechanical problems or a potential refrigerant leak.
Common mistakes
- Forgetting to turn off the main power supply before inspection.
- Ignoring dirty air filters, which significantly reduce efficiency.
- Attempting to open or repair sealed refrigerant lines.
- Using harsh chemicals to clean coils or filters.
When to call a professional
- If the AC consistently fails to cool or heat properly despite performing all DIY checks and fixes.
- If you hear a distinct hissing sound or notice an oily residue around refrigerant lines, indicating a potential gas leak.
- If there are persistent and loud unusual noises (e.g., grinding, screeching from inside the unit) that don’t resolve after basic checks.
- If you notice any frayed, burnt, or exposed electrical wiring, or smell burning plastic, as this is an electrical fire hazard.
- If ice continually forms on the evaporator coil or refrigerant lines, even after cleaning filters and allowing for defrosting. This often points to a refrigerant issue or serious airflow problem.
Want this done properly without the hassle?
Aap DIY try kar sakte hain, lekin agar time nahi ya confidence kam ho, to professional bula lena better hota hai. Galat step se damage ya safety issue ho sakta hai.