AC Unit Chemical Safety Check & Quick Fixes
Want this done properly without the hassle?
Aap DIY try kar sakte hain, lekin agar time nahi ya confidence kam ho, to professional bula lena better hota hai. Galat step se damage ya safety issue ho sakta hai.
Quick answer (read this first)
- Always power off your AC before any inspection or cleaning.
- Inspect your AC for visible signs of leaks, such as oily residue or unusual puddles, which could indicate a chemical (refrigerant) issue.
- Clear blocked drain pipes to prevent water overflow and related damage.
- Regularly clean air filters and coils for optimal airflow and efficiency.
- Listen for unusual sounds and check for strange smells that signal potential problems.
Safety first
- ALWAYS turn off the AC unit’s main power supply (both indoor and outdoor breakers) before any inspection, cleaning, or maintenance.
- Wear protective gloves and eye protection to guard against dust, sharp edges, and potential chemical irritants.
- NEVER attempt to open refrigerant lines, handle refrigerant chemicals, or tamper with sealed electrical components. These tasks require professional training and specialized tools.
- Ensure the work area is well-ventilated, especially if using any cleaning agents or sprays.
- If you detect a strong chemical odor or suspect a refrigerant leak, evacuate the area and immediately call a certified AC technician.
Tools you may need
- Screwdriver set (for AC panel access)
- Soft brush or vacuum cleaner with brush attachment (for dust and debris removal)
- Clean microfibre cloths or sponges
- Bucket and clean water (for drain pipe checks and cleaning)
- Flashlight (for detailed inspection of internal components)
- Mild, AC-safe coil cleaning spray (optional, specifically for evaporator or condenser coils)
- Protective gloves and safety glasses
Step-by-step
Step 1
1. Prioritize Safety: Disconnect Power. Locate and turn off the main power switch for both your indoor and outdoor AC units at the breaker. Confirm the unit is completely powered down before proceeding.
Step 2
2. Clean Indoor Air Filters. Open the indoor unit’s front panel. Carefully remove the air filters. Wash them with mild soap and water or vacuum them thoroughly, then allow them to dry completely before reinstallation.
Step 3
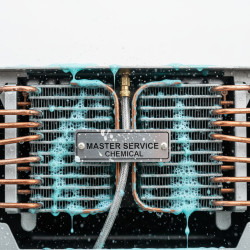
3. Inspect Indoor Coils for Leaks & Buildup. With the filters removed, use a flashlight to inspect the evaporator (cooling) coils inside the indoor unit. Look for dust, dirt, ice buildup, or any greasy/oily residue, which is a strong indicator of a refrigerant leak.
Step 4
4. Check and Clear Drain Line. Locate the drain pan and the primary drain pipe (typically a PVC pipe exiting the indoor unit). Check for standing water, visible blockages, mold, or algae. Gently pour a small amount of clean water into the drain pan to ensure it flows freely out of the outdoor end of the pipe. If blocked, attempt to clear with mild pressure or a wet/dry vacuum at the outdoor end.
Step 5
5. Examine Outdoor Condenser Unit. Move to the outdoor unit. Visually inspect the condenser coils for accumulated dirt, leaves, or other debris. Also, check the ground around the unit for any unusual puddles or oily spots, which could signify a refrigerant leak.
Step 6
6. Assess for Unusual Smells or Sounds. While inspecting, pay attention to any strange chemical smells (like rotten eggs or sweet odors) coming from either unit, which could indicate a gas leak. Listen for hissing, bubbling, or grinding noises.
Step 7
7. Reassemble and Restore Power. Once all inspections and basic cleaning are complete, ensure all panels are securely closed and air filters are reinstalled. Restore power to both the indoor and outdoor units at the breaker.
Step 8
8. Test AC Operation. Turn on your AC unit and set it to a low temperature. Monitor its performance for the first 15-20 minutes. Listen for any abnormal sounds and confirm that it is cooling effectively and consistently.
Common mistakes
- Failing to completely disconnect power before starting any work, risking electric shock.
- Overlooking early signs of refrigerant leaks (oily residue, strange smells), leading to costly repairs and environmental damage.
- Using inappropriate or harsh cleaning agents and abrasive tools on delicate AC coils, causing damage.
- Neglecting routine air filter cleaning, which significantly reduces AC efficiency, increases energy bills, and strains the system.
- Attempting complex repairs or opening sealed components without professional expertise and proper tools.
When to call a professional
- If you detect any strong chemical odors (sweet, rotten egg, or metallic smells) or significant oily residue, immediately suspect a refrigerant leak and call a professional.
- If your AC unit fails to cool effectively, produces only warm air, or cycles on and off repeatedly even after performing all basic checks and cleaning.
- If you hear persistent loud grinding, hissing, bubbling, or banging noises that indicate internal mechanical problems.
- If you observe any visible electrical issues, such as frayed or burnt wires, sparking, or a burning plastic smell.
- If water consistently overflows from the indoor unit’s drain pan, even after you’ve attempted to clear the drain pipe.
- If any AC component is visibly damaged, corroded, or if you encounter issues beyond simple cleaning and inspection.
Want this done properly without the hassle?
Aap DIY try kar sakte hain, lekin agar time nahi ya confidence kam ho, to professional bula lena better hota hai. Galat step se damage ya safety issue ho sakta hai.