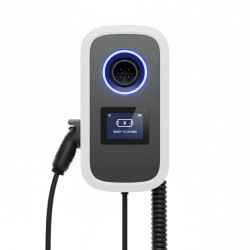
How to do a Basic EV Charger Installation Safety Check and Quick Fixes
Want this done properly without the hassle?
Aap DIY try kar sakte hain, lekin agar time nahi ya confidence kam ho, to professional bula lena better hota hai. Galat step se damage ya safety issue ho sakta hai.
Starting from
Rs. 2500
Quick answer (read this first)
- Inspect your EV charger and cable for any visible damage.
- Verify the dedicated circuit breaker for your charger is ‘ON’.
- Confirm secure connections at both the vehicle and the charging unit.
- Perform a power cycle (reset) on the charger if the problem continues.
Safety first
- Always turn off power at the main breaker before inspecting any electrical components.
- Never touch bare wires or attempt to open the EV charger unit.
- Use insulated tools when working near electrical connections.
- Keep children and pets away from the work area during inspections.
- Do not attempt repairs if you are unsure or uncomfortable with electrical work.
Tools you may need
- Flashlight
- Insulated gloves
- Screwdriver (for cover plates only, not internal wiring)
- Non-contact voltage tester (optional)
Step-by-step
Step 1
- Perform a Visual Inspection: Carefully examine the EV charger unit, charging cable, and wall outlet for any visible damage, fraying, discoloration, or loose connections. Look for signs of water ingress or pests.
Step 2
- Check the Circuit Breaker: Locate the dedicated circuit breaker for your EV charger in your home’s distribution board. Confirm it is in the ‘ON’ position. If it’s tripped (usually halfway between ON and OFF), switch it completely OFF, then back ON.
Step 3
- Examine Charger Indicator Lights: Observe the LED indicator lights or display panel on your EV charger. Consult your charger’s manual to understand what different light patterns or error codes signify. Note any unusual displays.
Step 4
- Secure Cable Connections: Ensure the charging cable is firmly and correctly plugged into both your electric vehicle and the EV charger unit. A loose connection can prevent charging or cause intermittent issues.
Step 5
- Reset the Charger Unit: If no physical damage or tripped breaker is found, try resetting the charger. Turn off its dedicated circuit breaker for at least 60 seconds, then switch it back on. This can clear minor internal glitches.
Step 6
- Test GFCI/RCD (if applicable): If your charger or circuit includes a Ground Fault Circuit Interrupter (GFCI) or Residual Current Device (RCD), press its ‘Test’ button, then the ‘Reset’ button. A tripped GFCI/RCD can stop power flow.
Step 7
- Isolate the Problem: If possible, test with a different, known-good charging cable or, if accessible, with another EV. This helps determine if the issue is with the charger unit, the cable, or your vehicle.
Common mistakes
- Ignoring warning lights or error messages on the charger’s display.
- Using a charging cable that has visible damage or frayed insulation.
- Attempting to open the EV charger unit or repair internal wiring yourself.
- Overlooking a tripped circuit breaker as the cause of power loss.
- Not ensuring secure connections at both the vehicle and the charger unit.
When to call a professional
- If you observe sparks, smoke, or a burning smell coming from the charger or wiring.
- If the circuit breaker for the charger frequently trips after resetting.
- When there is visible damage to the main electrical wiring or the wall socket.
- If the charger continuously displays error codes despite basic troubleshooting.
- Anytime you are unsure about a repair step or feel unsafe working with electricity.
- If the problem requires opening the charger unit or working directly with the main electrical panel.
Want this done properly without the hassle?
Aap DIY try kar sakte hain, lekin agar time nahi ya confidence kam ho, to professional bula lena better hota hai. Galat step se damage ya safety issue ho sakta hai.
Starting from
Rs. 2500
100% Money Back Guarantee
If you are not satisfied with the service